

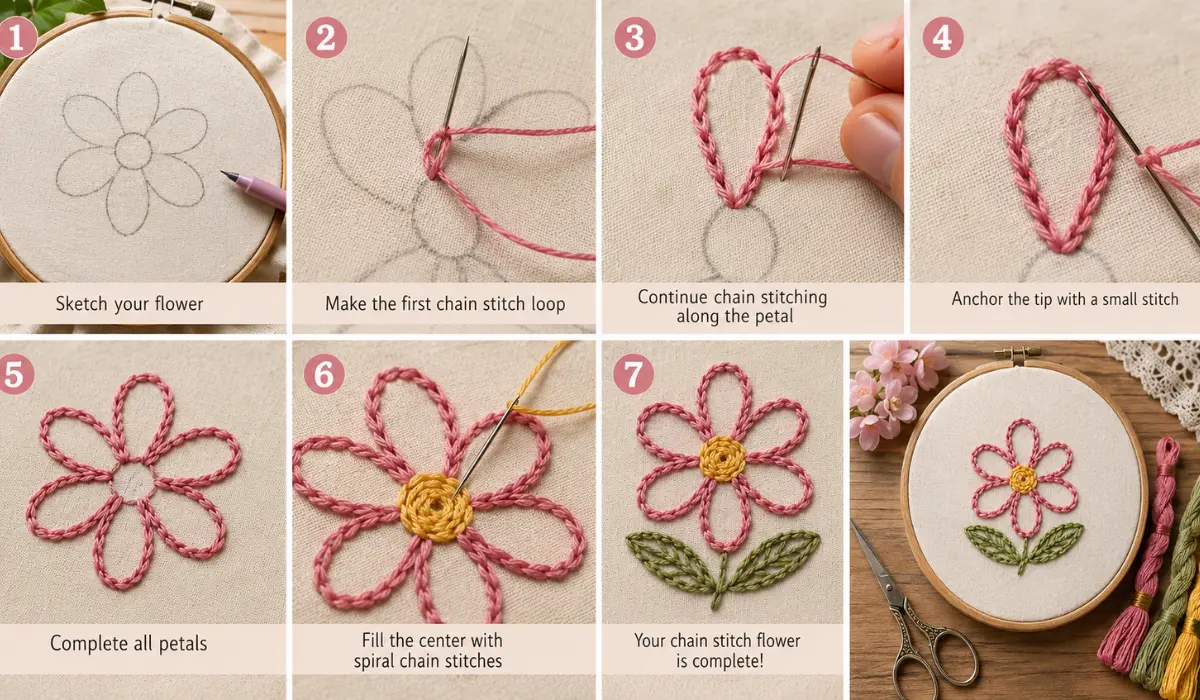
Chain-stitching is a hand embroidery technique made by looping thread and pulling it through itself in a repeating chain, which naturally curves to form petal shapes. With just a needle, some floss, and about 15 minutes, you can stitch a complete flower from scratch — no prior embroidery experience needed.
Table of Contents
Why Chain-Stitching Works So Well for Flowers
I didn’t pick chain-stitching by accident. I’d tried satin stitch first, and my petals kept coming out lumpy and uneven. Chain-stitching fixed that problem for me almost immediately — the natural curve of each little loop follows the rounded shape of a petal on its own, so you don’t have to fight the fabric to get a nice curve. It’s forgiving in a way a lot of other stitches aren’t, which is exactly why I still recommend it to anyone picking up a needle for the first time.
What You’ll Need Before You Start
Nothing fancy here — most of this you probably already have in a craft drawer somewhere.
- An embroidery hoop (4–6 inches is the easiest size to hold)
- A scrap of cotton fabric — quilting cotton or muslin both work fine
- A crewel needle, size 7 or 8
- Embroidery floss in two colors (one for petals, one for the center)
- Small embroidery scissors
- A fabric pen or chalk pencil for sketching your flower
Let’s Stitch: The 15-Minute Flower
I’m going to walk you through this the way I’d explain it to a friend sitting next to me, because that’s genuinely the easiest way to learn a stitch — watching someone else do it slowly, then trying it yourself.
First, sketch your flower (about 2 minutes). Draw a small circle in the middle of your hoop — that’s your flower’s center. Around it, sketch five or six teardrop shapes pointing outward, like petals on a daisy. Don’t worry about making it perfect. Mine never look like the drawing anyway, and it still turns into a flower.
Thread your needle and knot the end. Cut about 18 inches of floss — any longer and it’ll start tangling on you halfway through, which I learned the annoying way on my second flower ever.
Start your first loop. Bring the needle up from the back of the fabric at the base of a petal. Put it back down almost in the same spot, but don’t pull it all the way through — leave a small loop sitting on top of the fabric. Bring the needle back up a short distance ahead, right through that loop, and pull gently. That’s your first chain link.
Keep chaining along the petal shape. Repeat that same motion — down into the last loop, up a little further along, pull through — following your petal’s outline. This is the part that takes the longest, roughly 5–6 minutes per flower, and it’s also the part where you’ll find your rhythm. By the third or fourth petal, your hands just know what to do.
Anchor the tip. At the point of each petal, take one small straight stitch over the last loop to lock it in place. Skip this step and you’ll find loose loops unraveling on you later — I know because I skipped it on my first flower and had to go back and fix two petals.
Fill in the center. Switch to your second color and stitch small, tight chain loops in a spiral until the center circle is completely filled.
Tie off and trim. Knot the thread on the back, snip the loose ends, and give it a light press from behind if the fabric’s a bit puckered.
What I’d Tell You If I Were Sitting Next to You
A few things took me longer to figure out than they should have, so let me save you the trouble:
Keep your loops small. Big, loose loops might feel faster in the moment, but they end up looking sloppy instead of like a neat little chain. Don’t pull the thread too tight either — chain-stitching is supposed to sit slightly raised off the fabric, not flat and pressed in.
A hoop genuinely matters here. I tried stitching without one early on to save time, and the fabric puckered so much that my “flower” looked more like a crumpled tissue. Keep the fabric taut and everything else gets easier.
If your floss is fraying or knotting constantly, it’s almost always because the strand is too long. Cut shorter pieces than you think you need.
And go slow around the curves. I know it’s tempting to speed up once you find your rhythm, but rushing the curve of a petal flattens it into something closer to a straight line. Small, careful stitches are what keep the shape round.
Quick Answers to Common Questions
Is chain-stitching hard to learn?
Not really. Most people get the hang of the loop-and-pull motion within their first few stitches — it’s one of the more forgiving embroidery techniques for that reason.
How long does this actually take?
About 15 minutes once you know the motion. My very first flower took closer to 25 minutes because I kept second-guessing my tension. Give yourself grace on the first one.
What floss should I use?
Standard 6-strand embroidery floss works fine. I use 2–3 strands when I want something delicate, or all 6 when I want a bolder, thicker chain.
Can chain-stitching fill in shapes, not just outline them?
Yes — stitching the loops in a tight spiral, like I did for the flower center here, is a common way to fill small areas.
Do I really need a hoop?
Technically no, but I’d strongly recommend it. It keeps the fabric taut, which makes controlling your stitch tension a lot easier — especially while you’re still learning.
Written by By Sara McLean