

When I first attempted a french knot embroidery fifteen years ago, I completely botched it. My thread tangled, my knot disappeared into the fabric, and I nearly gave up on embroidery altogether. Today, I’ve created thousands of these stitches for clients, taught hundreds of students, and discovered that this one technique has genuinely transformed how I approach textile art. If you’re starting your embroidery journey, let me share exactly what I’ve learned so you don’t waste months figuring this out like I did.
Table of Contents
What Is a French Knot Stitch
A french knot is deceptively simple—it’s an embroidery knot stitch that creates dimensional, perfectly rounded dots on fabric. But here’s what makes it special: it’s the gateway stitch to everything else. Once I mastered how to do a french knot, I suddenly understood tension, control, and needle manipulation in ways that elevated my entire embroidery practice. Whether you’re working on cross stitch embellishments, needlepoint projects, or pure surface embroidery, this single technique unlocks professional-quality results. The french knot stitch takes just three movements, but those movements require understanding that goes deeper than most tutorials show.
Tools and Materials You’ll Need
Before you start, gather these essentials:
- Embroidery floss or thread (I recommend 2-3 strands for beginners)
- Embroidery needle (size 7-9 works best)
- Fabric (linen or cotton blends are ideal)
- Embroidery hoop (to keep fabric taut)
- Scissors
- A printed pattern or fabric you’re personalizing
Step-by-Step French Knot Tutorial
How to Make a French Knot in 3 Simple Steps
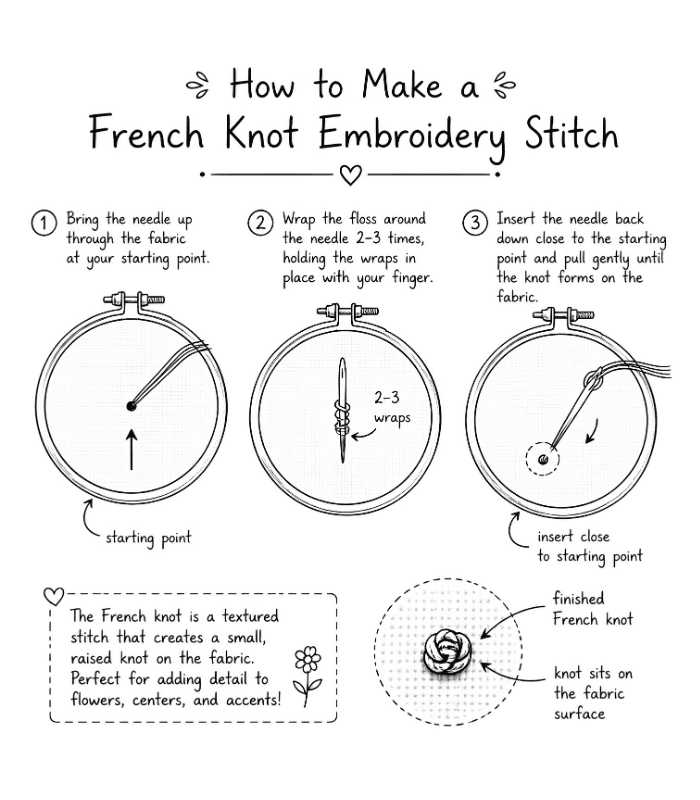
Step 1: Thread Your Needle and Position Start by threading your needle with 2-3 strands of embroidery floss. Bring the needle up through your fabric at the desired location. This is where your embroidered dot will appear. Hold the needle perpendicular to your fabric surface.
Step 2: Wrap Your Thread This is the crucial part of the french knot stitch. Wrap the floss around your needle once or twice, depending on the knot size you want. Keep the wraps loose but controlled. Tension here determines whether you get beautiful embroidered dots or tangled mess—trust me, I’ve been there!
Step 3: Pull and Pierce While holding the wrapped thread taut (but not tight), insert your needle into the fabric just beside where you came up. Pull the needle through in one smooth motion. As you pull, the wrapped thread will bunch up, creating that signature dimensional knot.
What I’ve Learned: Real Tips from 15 Years of French Knot Experience
I spent my first two years making every mistake possible with how to do french knot embroidery, and honestly, those failures taught me more than success ever could. Here’s what actually separates beautiful embroidered dots from the frustrating disasters I used to create:
Tension is everything. I used to white-knuckle my thread, thinking force would create better knots. Wrong. The best french knot tutorial I ever received came from an elderly embroiderer who simply said, “Your hands should feel relaxed, not fighting.” Now when I teach how to make french knots, I watch people’s shoulders drop as they learn this single lesson transforms their results completely.
Thread length matters more than you’d think. Eighteen inches is my sweet spot—long enough to work efficiently, short enough that fraying and tangling don’t derail your embroidery knot stitch. I learned this after wasting an entire spool of expensive Italian floss on a project because I was too lazy to re-thread my needle.
Wraps determine your aesthetic. One wrap creates delicate, refined dots perfect for dainty embroidery patterns. Two wraps give you bolder texture. After creating thousands of embroidered dots, I’ve discovered that mixing one and two-wrap french knots in the same piece creates depth that catches light beautifully. This technique works phenomenally in both cross stitch and needlepoint.
The Mistakes I Made So You Don’t Have To
Every single student I’ve taught who struggled with how to make french knots in embroidery made one of these mistakes. Most made all of them—because I did.
Mistake #1: Death Grip Wrapping. I was convinced that squeezing the thread around my needle would create a permanent knot. Instead, my french knot stitch pulled so tight it either disappeared or created lumpy, misshapen dots. The day a mentor gently unwrapped my thread and showed me “loose but controlled,” everything clicked.
Mistake #2: The Long Needle Exit. This is the killer. I’d insert my needle two, sometimes three millimeters away from my entry point. Know what happened? My embroidered dots came out lopsided and inconsistent. Keep that needle insertion point right next to where you came up. This single adjustment elevated my work immediately.
Mistake #3: Floss Overload. I thought using 6 strands would make my french knot tutorial results look “professional.” Nope. Just created messy tangles. The perfect amount? 2-3 strands, maximum. This is non-negotiable if you want clean embroidery knot stitches.
Mistake #4: Angle Problems. I used to pull my needle at this diagonal angle, thinking I was clever. My knots came out wonky every single time. Then I realized: pull straight down, smooth and deliberate. That’s it. Consistent results every time.
Mistake #5: Skipping the Practice Grind. I wanted to jump straight to my “real” project. That piece took three times longer because I was still learning on it. Now? I always spend 30 minutes on practice fabric first. Your muscle memory needs that foundation.
French Knots in Different Projects
I use french knots in everything from delicate embroidery patterns to bold statement pieces:
- Flower centers – Creates dimensional blooms
- Texture accents – Adds interest to backgrounds
- Dotted designs – Perfect for abstract patterns
- Cross stitch embellishment – Elevates traditional designs
- Needlepoint projects – Adds raised detail
Frequently Asked Questions
How do I make French knots embroidery look professional?
Consistency is key. Practice the same stitch multiple times to develop rhythm. Keep your knots evenly spaced and uniform in size. Blocking your finished piece helps set the knots beautifully.
What’s the difference between French knots and other embroidery knot stitches?
The french knot creates a rounded bump with the wrap around the needle. Other knot stitches like colonial knots have different wrapping techniques that create varied effects. Each serves different aesthetic purposes.
Can I use French knots in cross stitch projects?
Absolutely! Cross stitch french knots add wonderful dimension. Use the same needle and thread weight as your cross stitches for cohesive results.
How many wraps should I use for larger embroidered dots?
Start with 2-3 wraps maximum. More than that creates uncontrolled, messy knots rather than defined dots.
Is there a difference between french knot needlepoint and embroidery techniques?
The wrapping method stays the same, but needlepoint often uses thicker yarn, creating bolder knots. Adjust your wraps accordingly.