

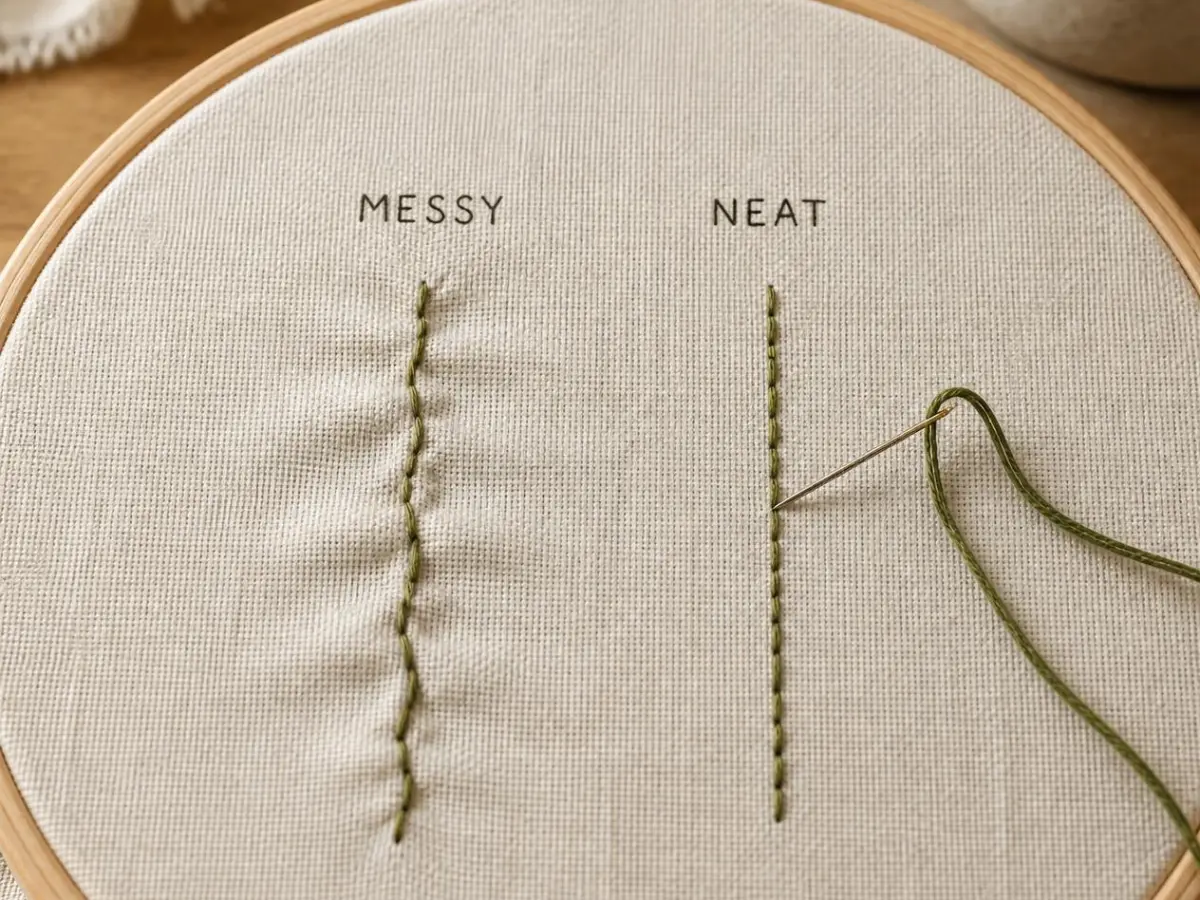
Your backstich looks messy because of one (or more) of five things: uneven stitch length, wrong thread tension, not pulling stitches all the way through, loose fabric, or a needle/thread mismatch. I’ve made every single one of these mistakes myself over the years, and the fix is almost never “practice more” — it’s usually one small habit change. Below is the exact troubleshooting process I use on my own applique pieces, and the one I walk beginners through when they message me a photo of a wobbly line asking “what did I do wrong?”
Table of Contents
A Bit of Honesty First
I still remember my first applique project — a little fabric fox for my niece. The front looked fine from three feet away. Up close, the backstich outline zig-zagged like it had a mind of its own, and the back looked like a bird’s nest. I almost gave up on hand stitching that week. Instead, I picked it apart, slowed down, and stitched it again. That second attempt is what taught me most of what’s in this guide — not a book, not a class, just redoing the same line until I understood why it kept going wrong.
That’s really the heart of this article: backstich isn’t hard. It’s forgiving, actually — one of the easiest stitches to unpick and redo. Most “messy” backstitch is a rhythm problem, not a skill problem, and once you see the five causes below, you’ll start catching yourself mid-stitch instead of after the fact.
What Is backstich?
backstich is a hand stitch that creates a solid, unbroken line of thread on the front of the fabric. You stitch forward, then bring the needle back to meet the end of the last stitch, so each new stitch “locks” into the one before it. It’s the stitch I reach for most often on applique work — outlining shapes, writing letters, adding fine detail lines — because when it’s done well, it looks almost like it was printed on.
Why Your backstich Looks Messy: 5 Real Causes
1. Uneven Stitch Length
This is the one I see most, in my own work and in photos students send me. If your stitches change size from one to the next, the whole row looks shaky, even if your tension is perfect. It’s rarely a hand-shakiness issue — it’s almost always a rhythm issue. You get distracted for two seconds, your next stitch is a little longer than the last, and suddenly the line looks off.
Why it happens: No guideline, rushing, or losing rhythm on curves.
2. Wrong Thread Tension
Two opposite problems, same category:
- Too tight → fabric puckers and bunches around the stitches.
- Too loose → the line looks saggy, with visible gaps or loops on the back.
I learned this one the hard way on a linen applique piece — I pulled every stitch snug because I thought “tight = neat.” The fabric puckered so badly around the line that I had to steam it flat and could still see a faint ripple. Thread should be pulled just enough to lie flat against the fabric, not cinched tight. This matters even more on stretchy or loosely woven applique fabric, since it can spring back once you take it out of the hoop.
3. Not Pulling the Stitch All the Way Through
A very common beginner slip — and honestly, one I still catch myself doing when I’m tired or stitching in low light. Leaving a tiny bit of slack every time you pull the needle through doesn’t look like much on one stitch, but it adds up into a wobbly, uneven line and a tangled-looking back.
4. Loose or Unstable Fabric
If your fabric isn’t held taut — in a hoop, or pinned/stabilized for applique — it shifts slightly with every stitch. That small shift is enough to throw off your spacing and direction, especially on curves and corners. I skip hooping small applique pieces more often than I should, and it’s the single most predictable way I end up with a wobbly line.
5. Wrong Needle or Thread for Your Fabric
A needle that’s too thick will distort tightly woven fabric. Thread that’s too thick, too thin, or low quality will snag, twist, or pull unevenly — all of which show up as a messy line. If your thread is fighting you every third stitch, it’s usually not you — it’s the pairing.
How to Fix a Messy Backstich: Step-by-Step
This is the process I actually use, in order, whenever a line starts looking off — not a generic checklist, but the sequence that’s saved most of my own projects.
Step 1: Stabilize Your Fabric First
Hoop your fabric drum-tight, or secure your applique piece with pins/basting before you stitch a single line. Loose fabric is the root cause behind several other problems on this list, so I always fix this one first, before I even thread my needle.
Step 2: Mark a Light Guideline
Use a fabric-safe marking pen or chalk to draw your stitch line before you start. This one habit alone fixed most of my early spacing problems — it feels like cheating, but nobody can tell once the thread’s on.
Step 3: Set a Consistent Stitch Length
Aim for stitches around 1/4 inch (6mm) apart as a starting point. Keep every stitch on the line the same length — this is the single biggest visible fix for a messy backstitch, and the one thing I check first when troubleshooting a photo someone sends me.
Step 4: Shorten Your Stitches on Curves
When you reach a curve or corner — very common in applique outlines — shrink your stitch length. Shorter stitches bend smoothly around curves; long stitches on a curve look choppy and angular, no matter how careful you are.
Step 5: Pull Every Stitch All the Way Through
After each stitch, gently pull the thread until it lies flat — not tight, not loose. I make myself say “pull through” in my head on the first few stitches of any new project, just to rebuild the habit after a break from stitching.
Step 6: Check Your Back Every Few Stitches
Stop every 6–8 stitches and glance at the back of your work. Slack threads or loops mean you’re not pulling fully through — catch it early and gently work the slack up before it compounds. This one habit has saved me from unpicking entire lines more times than I can count.
Step 7: Match Your Needle and Thread to Your Fabric
Use a sharp embroidery needle sized for your fabric weight, and a smooth, good-quality thread. If your thread keeps snagging or twisting mid-stitch, that’s your sign to switch — I’ve wasted far too much time blaming my technique when the thread was the actual problem.
Step 8: Practice on Scrap Fabric First
Before stitching your final appliqué piece, run a test line on a scrap of the same fabric. I still do this on every new fabric type, even after years of stitching — it takes two minutes and saves a lot of frustration.
Tools and Materials Checklist
- Embroidery needle (sharp point, sized for your fabric)
- Good-quality embroidery thread or floss
- Embroidery hoop (or pins/basting thread for appliqué pieces)
- Fabric-safe marking pen or chalk
- Small, sharp embroidery scissors
- Scrap fabric for practice
Common Beginner Mistakes
| Mistake | What It Looks Like | Quick Fix |
|---|---|---|
| No guideline | Wandering, crooked line | Draw a light guide before stitching |
| Long stitches on curves | Choppy, angular curve | Shorten stitch length on curves |
| Pulling too tight | Puckered fabric | Pull thread flat, not taut |
| Pulling too loose | Loopy, saggy line | Fully pull through every stitch |
| Loose fabric | Shifting, uneven spacing | Hoop or pin fabric taut first |
| Wrong needle/thread | Snagging, twisting thread | Match needle/thread to fabric weight |
Tips for Clean Backstitch on Appliqué Edges
- Work in short sections around tight curves rather than trying to stitch the whole shape in one continuous motion. I never try to power through a full curve in one go — it’s where mistakes creep in fastest.
- On sharp corners, take one very short stitch right at the point to keep the corner crisp instead of rounded.
- If a section looks off, unpick just that section rather than the whole line. backstich is genuinely easy to redo locally, which is part of why I like teaching it to beginners — mistakes are rarely permanent.
- Keep your working thread length short (about 18 inches). Long thread tangles more and drags your tension off, something I learned after one too many knotted messes mid-project.
Frequently Asked Questions
Why does my backstich have gaps between stitches?
Gaps usually mean you’re not pulling the stitch all the way through, or your tension is too loose. Pull each stitch flat and check your work every few stitches to catch slack early.
Why does my fabric pucker when I backstitch?
Puckering happens when thread tension is too tight or the fabric isn’t stabilized. Loosen your pull slightly and make sure your fabric is taut in a hoop or pinned securely before stitching.
How do I keep my backstitch even on curves?
Shorten your stitch length as you approach a curve. Shorter stitches bend smoothly, while long stitches create a choppy, angular look.
What’s the ideal backstitch length for appliqué?
Around 1/4 inch (6mm) is a good starting point for most appliqué outlines, shortened to 1/8 inch or less on tight curves and corners.
Can I fix a messy backstitch without redoing the whole line?
Yes. Unpick only the uneven section, then re-stitch just that part while matching the stitch length of the rest of the line. This is exactly how I fix my own mistakes — no need to start over.