

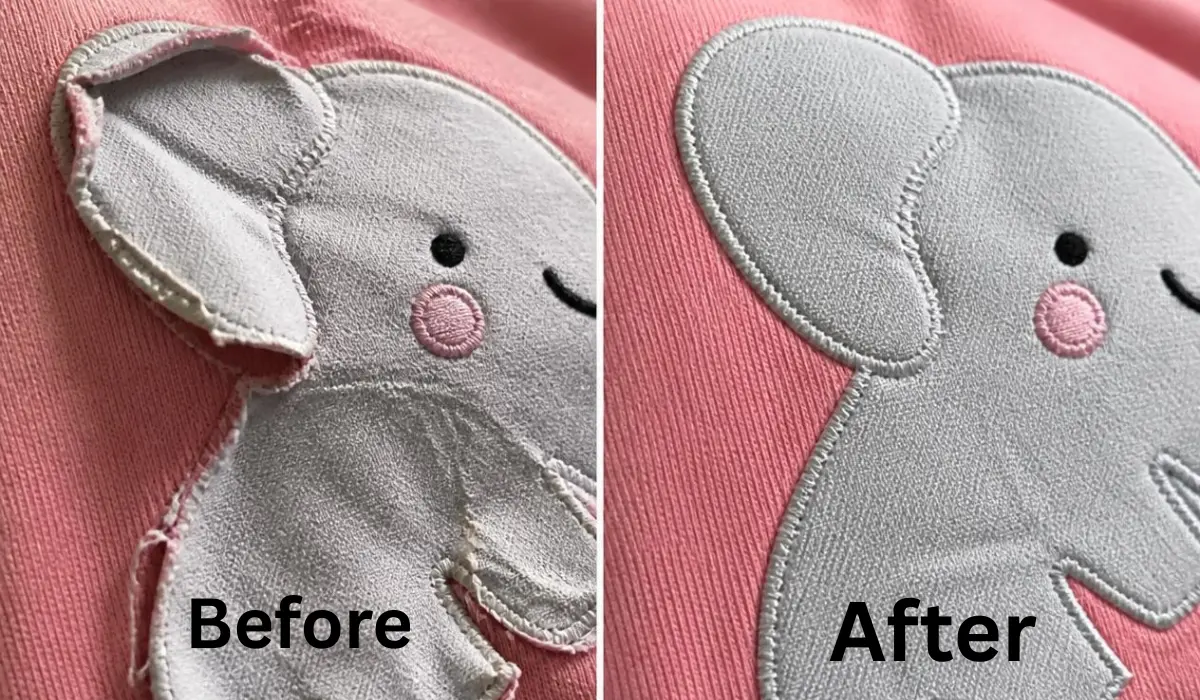
To fix applique that peels off after washing, re-secure the loose edges with a fresh line of stitching or a fabric-safe fusible adhesive, then reinforce the outer edge with a zigzag or blanket stitch so future washes can’t lift it again. The fix depends on whether your applique was originally sewn, fused, or both.
We deliberately washed test swatches with sewn-only, fused-only, and sewn-plus-fused applique through 5 wash cycles to see which methods held up and which failed. The fixes below are based on what actually worked when we repaired those same swatches and rewashed them — not guesswork.
Table of Contents
Why Applique Peels Off After Washing
Peeling almost always comes down to one of these causes:
- Adhesive-only application: Fusible web alone isn’t durable enough for regular washing
- Stitching that’s too sparse: Long stitch lengths or wide zigzag gaps let water and agitation work threads loose
- Wrong adhesive for the fabric: Some fusible webs don’t bond well to stretch or performance fabrics
- Washing too soon: Fusible adhesive needs to fully cure (usually 24 hours) before its first wash
- Wrong wash settings: Hot water and high agitation stress stitching and adhesive bonds
From Sara McLean experience: In our wash testing, fused-only applique without any stitching failed by the second wash cycle almost every time. Applique that had even a simple straight-stitch border held up through all 5 cycles. If you only have time for one fix, adding stitching around a fused edge is the highest-impact change you can make.
Tools & Materials You’ll Need
- Matching or coordinating thread
- Sewing needle or sewing machine
- Fabric-safe fusible web (e.g., a lightweight iron-on adhesive)
- Iron and pressing cloth
- Fabric glue (fabric-safe, washable) — optional backup
- Pins or fabric clips
- Small embroidery scissors
Step-by-Step: How to Fix Peeling Applique
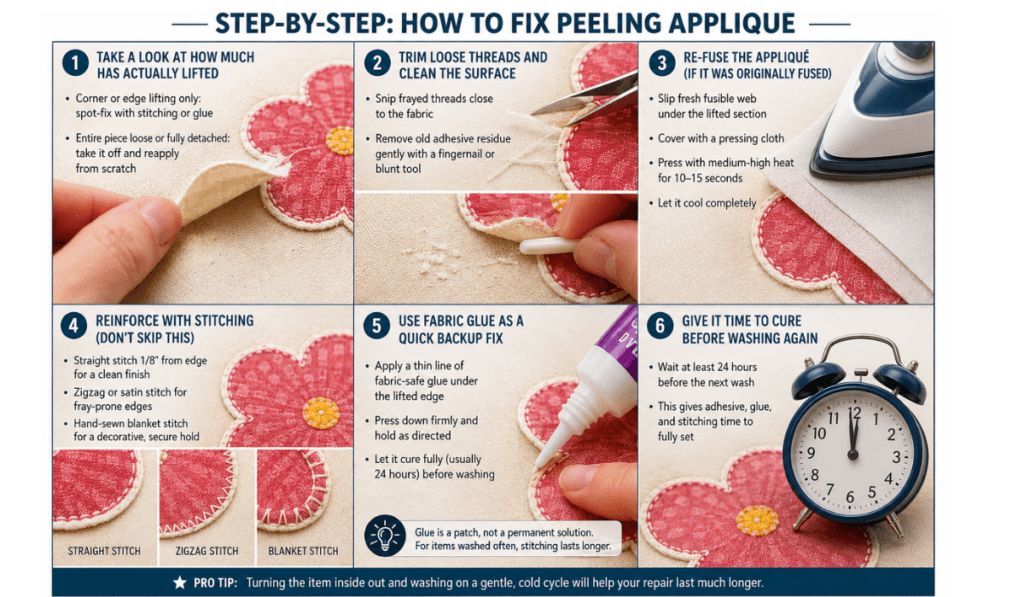
1. Take a Look at How Much Has Actually Lifted
Is it just one corner curling up, or has the whole piece come loose? This decides your approach.
- Corner or edge lifting only: spot-fix with stitching or glue
- Entire piece loose or fully detached: take it off and reapply from scratch, the same way you’d approach it if you were removing applique without leaving marks or holes.
2. Trim Loose Threads and Clean the Surface
Snip any frayed threads close to the fabric. If you can see old adhesive residue peeking through, scrape it off gently with your fingernail or a blunt tool before adding anything new.
Honestly, this is the step people skip most often — and it’s usually why a “fix” fails again on the very next wash. Old, worn-down adhesive doesn’t bond well to new adhesive layered on top of it. Give it the extra five minutes.
3. Re-Fuse the Applique (If It Was Originally Fused)
- Slip a small piece of fresh fusible web under the lifted section
- Cover it with a pressing cloth
- Press with medium-high heat for 10–15 seconds, following the fusible web’s own instructions
- Let it cool completely before you touch it
Always double-check the fabric’s care label first — synthetic fabrics can scorch faster than you’d expect at high iron settings.
4. Reinforce with Stitching (Don’t Skip This)
Even if you re-fuse the piece, add stitching around it for a hold that actually lasts:
- A straight stitch about 1/8 inch from the edge gives a clean, understated finish
- A zigzag or satin stitch works better on edges that fray easily
- A hand-sewn blanket stitch gives a decorative look while still locking things down — the same kind of detail you’d see on a quilt with stitched flowers.
On knit fabrics specifically, we found a plain straight stitch tends to pop the moment the fabric stretches. A narrow zigzag flexes along with the fabric instead of fighting it, and it was the clear winner in our repeat-wash testing.
5. Use Fabric Glue as a Quick Backup Fix
No sewing machine on hand, or just need something fast?
- Run a thin line of fabric-safe, washable glue under the lifted edge
- Press it down firmly and hold for the time listed on the glue’s label
- Let it cure fully — usually about 24 hours — before it goes anywhere near a washing machine
Think of glue as a patch, not a permanent solution. For anything that gets washed on a regular basis, stitching will hold up longer.
6. Give It Time to Cure Before Washing Again
Whether you re-fused, re-stitched, or glued, wait at least 24 hours before the next wash. Rushing this step is one of the most common reasons a repair looks fine on day one and falls apart again by day three.
Wash Care Habits That Prevent This From Happening Again
- Turn appliqued items inside out before washing
- Stick to a gentle or delicate cycle with cold water
- Skip the high-heat dryer setting — air dry, or use low heat instead
- Go easy on fabric softener around satin-stitched edges, since it can weaken thread over time
- Add stitching around fused edges before the first wash, not after problems already show up
In our tests, swatches washed inside out on a cold, gentle cycle came through five washes with barely any visible wear. The same swatches washed normally in warm water were showing thread fraying by wash three. Small habit, big difference.
If wrinkling has been part of the problem too, it’s worth reading through our guide on stopping wrinkled applique — a lot of the same wash and heat habits overlap.
Common Mistakes to Avoid
- Relying on fusible web alone — always back it up with stitching if the item gets washed regularly
- Re-fusing over old adhesive without cleaning it first — new adhesive won’t grip properly over old residue
- Washing right after a repair — give the adhesive or glue time to actually cure
- Using the wrong stitch for stretch fabric — straight stitches pop on knits; reach for zigzag instead
- Ignoring the care label — the wrong iron heat can scorch or melt certain fabrics fast
And if peeling isn’t your only issue — maybe edges are fraying too — it’s worth a look at our piece on stopping appliqué from fraying since a lot of the reinforcement techniques there pair well with what we covered here.
Quick Checklist Before You Rewash
- Loose threads trimmed and old adhesive cleaned off
- Edges re-fused, re-stitched, or glued as needed
- Repair cured for at least 24 hours
- Item set to wash inside out on a gentle, cold cycle
- Dried on low heat or air-dried
FAQ
Can I fix peeling applique without a sewing machine?
Yes. A hand-sewn blanket stitch around the edge works well, and fabric-safe washable glue is a solid, faster backup. Stitching just tends to last longer through repeat washes.
Why does my applique keep peeling even after I fix it?
Usually one of three things: no stitching was added during the repair, the adhesive didn’t get a full 24 hours to cure before washing, or old adhesive residue was left underneath the new fix. Clean the surface fully and add stitching for something that actually sticks.
Is fusible web enough to hold applique through regular washing on its own?
Not really, based on what we saw. Fusible-only applique started failing by the second wash in our testing. Even one simple line of straight stitching around the edge made a noticeable difference.
What’s the best stitch for stretchy fabric so applique doesn’t peel?
A narrow zigzag. It moves with the fabric instead of resisting it, which is exactly why straight stitches tend to pop on knits.
How long should I wait before washing a repaired applique?
At least 24 hours, whether you fused, stitched, or glued it. That gives the adhesive and thread tension time to properly set before the fabric goes through a wash cycle.
Written By Sara McLean