

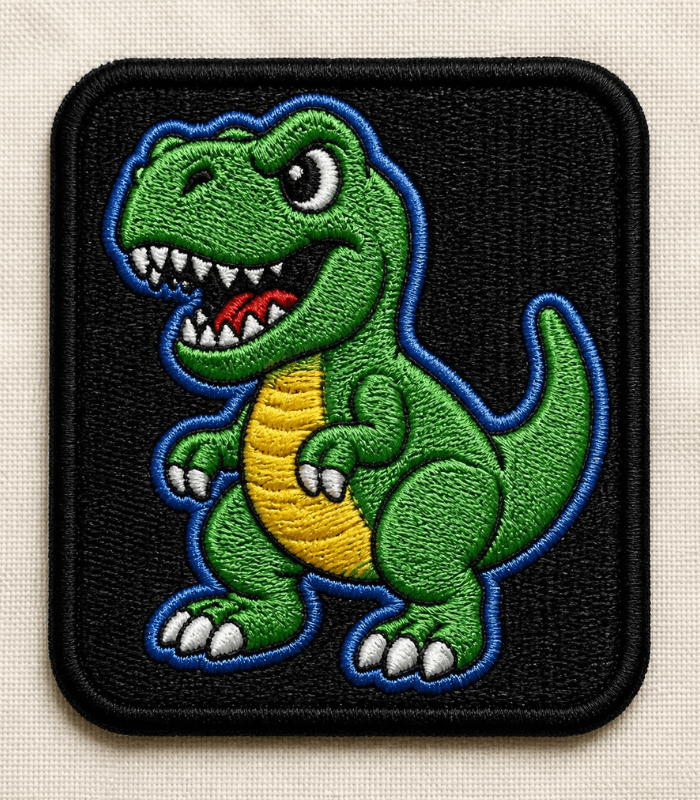
T-Rex embroidery is the technique of stitching or appliquéing a Tyrannosaurus Rex design onto fabric, usually for kids’ clothing, patches, hoodies, or nursery décor. It combines a few core stitches — satin stitch for the body, backstitch for outlines, and French knots for eyes and texture — to bring a bold, playful dinosaur to life on fabric.
I get asked about this design constantly, mostly from parents making birthday shirts or teachers stitching classroom patches. It looks intricate, but it’s actually one of the more beginner-friendly novelty designs once you break it into sections.
Table of Contents
What Is T-Rex Embroidery?
T-Rex embroidery usually means one of two things, and it’s worth knowing the difference before you start:
- Appliqué T-Rex — a dinosaur shape cut from fabric, attached to a base fabric, then finished with a stitched edge (often satin or blanket stitch)
- Thread-stitched T-Rex — the whole design worked entirely in embroidery thread, with no fabric cutout at all
Appliqué is faster and better for beginners or bulk projects like a batch of birthday shirts. A fully thread-stitched T-Rex takes longer but gives you more control over shading, teeth, and texture detail.
Tools and Materials You’ll Need
- Embroidery hoop (6-inch works well for most T-Rex sizes)
- Embroidery needle (size 7–9 crewel needle)
- Stranded cotton floss in green, dark green, and black (plus white or cream for teeth)
- Base fabric — cotton or a stable knit for clothing
- For appliqué: a second fabric scrap for the dinosaur body, plus fusible interfacing
- Fabric marker or water-soluble pen for tracing the outline
- Small, sharp embroidery scissors
How to Make a T-Rex Embroidery Design: Step by Step
- Trace or print your T-Rex outline onto the fabric, or transfer it onto interfacing if you’re doing appliqué.
- Cut and fuse the body shape (appliqué method only) — iron the fusible interfacing to your fabric scrap, cut along the outline, then fuse it onto the base fabric.
- Outline the whole shape first using a backstitch or stem stitch. This locks the edge in place and gives you a clean line to fill toward.
- Fill the body using a satin stitch for smaller areas like the head and arms, or a contour-filled stitch for the larger belly and tail, so the curve of the body reads naturally instead of looking flat.
- Add the teeth in short, straight white or cream stitches along the jawline.
- Stitch the eye with a single French knot — it’s a small detail, but it’s what makes the design feel alive rather than like a flat green blob.
- Finish the edges with a tight satin or blanket stitch if you’re working appliqué, to stop the fabric from fraying over time.
A tip I give every beginner: stitch the darkest shading first (the belly shadow, the underside of the tail), then work your way to the lightest tones last. It’s much easier to layer a light color over a dark edge than the other way around.
Best Stitches for T-Rex Embroidery
- Satin stitch — for the smooth, filled sections of the head, arms, and small legs
- Contour stitch — for the body and tail, so the curve of the dinosaur looks rounded instead of stiff
- Backstitch or stem stitch — for clean outlines and the spine ridge along the back
- French knot — for the eye, and optionally for small texture dots along the back if you want a scaled look
You don’t need anything exotic here. This is a genuinely good project for practicing four or five core stitches you’ll reuse in almost every other embroidery design you attempt afterward.
Common Mistakes Beginners Make
- Skipping the outline stitch, which leaves fill stitches looking uneven at the edges
- Making the arms too thin to stitch cleanly — T-Rex arms are already small in real proportion, so exaggerate them slightly on your pattern
- Using one flat shade of green, which makes the design look flat instead of dimensional
- Rushing the teeth, which end up as one blurry white blob instead of individual points
- Forgetting to secure appliqué edges, leading to fraying after a few washes
Tips for a More Realistic T-Rex Design
- Use two or three shades of green for natural shading — darker underneath, lighter on top.
- Keep the teeth short and slightly uneven; perfectly even teeth actually look less natural.
- Add a single French knot eye rather than a solid filled circle — it catches the light and looks more alive.
- If it’s going on kids’ clothing, keep stitches tight and secure; small hands tend to test the durability of every patch.
- Wash and dry a test swatch before gifting anything, especially appliqué pieces, to make sure the edges hold up.
FAQ
Is T-Rex embroidery good for beginners?
Yes. It uses common stitches — satin, backstitch, and French knot — and can be simplified into a basic appliqué shape if you’re not ready for detailed thread fill work.
Should I appliqué or fully embroider a T-Rex design?
Appliqué is faster and more durable for kids’ clothing. Full thread embroidery takes longer but gives more control over shading and texture.
What stitch works best for the T-Rex’s body?
A contour-filled stitch gives the body and tail a natural curve. Satin stitch works well for smaller, flatter areas like the head and arms.
How do I make the design look less flat?
Use at least two shades of green and add a single French knot eye. Flat single-color fills are usually what makes a design look basic rather than finished.
Can I embroider a T-Rex directly onto a hoodie or knit fabric?
Yes, but stabilize the fabric with a fusible interfacing or stabilizer first. Knit fabric stretches, and unstabilized stitching will pucker or distort over time.