

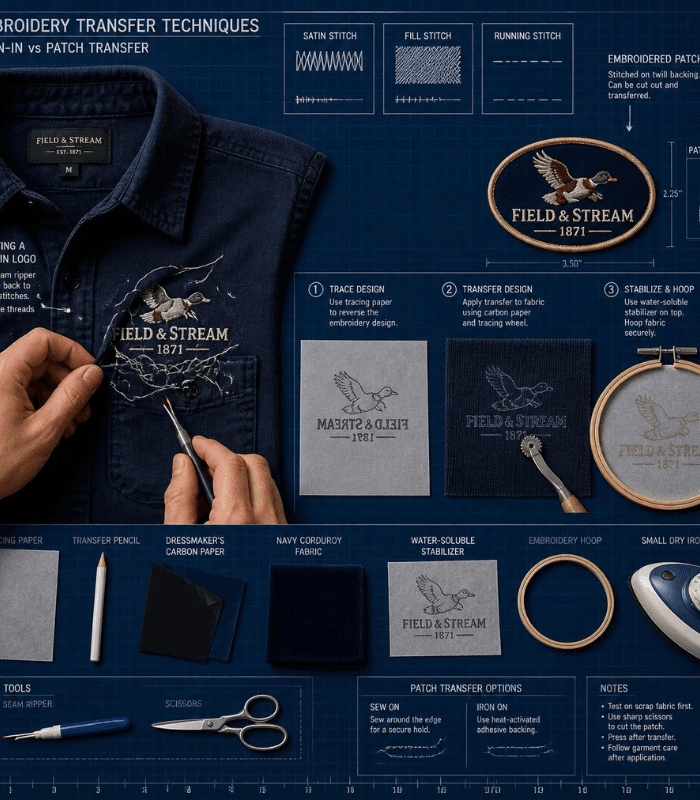
I learned this the expensive way, years ago, trying to save a logo off a jacket I’d ruined in the wash. I spent forty minutes with a seam ripper working from the back of the fabric, where the tension is looser, only to realize the logo was stitched directly into the shirt with no backing patch underneath it. There was nothing to lift off in one piece — just loose thread. If your logo sits on its own oval or rectangle of fabric, you’re in luck: cut around it, fuse a layer of Steam-A-Seam or Wonder Under to the back, iron it onto the new shirt, and edge-stitch the border so it holds through washing. That’s a genuine transfer. But a logo stitched straight into the garment almost always looks better re-embroidered from scratch than unpicked and reattached — past a few hundred stitches, it’s just faster to start over.
That said, most people asking about embroidery transfers aren’t rescuing an old logo at all — they’re trying to get a design onto blank fabric before they’ve stitched anything. This is where I actually spend most of my time, and it’s genuinely simple once you’ve done it a few times.
My go-to for hand embroidery is still the transfer pencil. Trace your pattern in reverse onto tracing paper, iron it face-down onto your fabric for ten to fifteen seconds, then lift it straight up and check the line before you commit. I get two or three uses out of one traced sheet before the wax gets too faint to read. The catch — and I learned this on a navy corduroy pillow that never worked out — is that it only shows up on light, smooth fabric.
For anything dark or textured, I switch to dressmaker’s carbon paper and a tracing wheel. Carbon-side down, trace firmly, and the pressure leaves a clean line even on fabric that would swallow a transfer pencil whole. It’s also, honestly, the most reliable way to transfer a cross stitch pattern to fabric, since the wheel gives you even, repeatable pressure across a grid.
When I’m working from a printed or digital design and want zero visible marking left behind, I print or trace the pattern onto water-soluble stabilizer, baste it to the fabric, and stitch right through both layers. Soak it in water afterward and the stabilizer disappears completely — just your stitching remains. It’s become my default for detailed embroidery pattern transfer work on fabric too dark or busy for tracing.
A few things I tell every student: press with a dry iron, never steam — moisture smears a wax transfer before it sets. And always test your marking tool on a scrap first. I once heat-set a water-soluble pen line by accident, and it oxidized into a stain I couldn’t get out. The line only needs to survive until your first stitch covers it — it doesn’t need to be permanent, and treating it like it should be is how projects get ruined.
If there’s one thing fifteen years of appliqué and pattern work has taught me, it’s that the fanciest tool rarely wins. The carbon paper and tracing wheel I bought as a beginner still outperform half the printable transfer paper on the market today.