

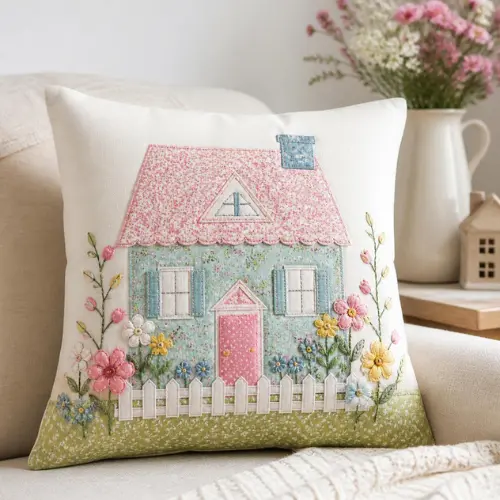
A house pillow design is a fabric pillow with a stitched or appliquéd house on the front — just a square body, a triangle roof, and a couple of tiny windows and a door. It’s one of the first projects I hand to beginners because the shapes are so forgiving, and honestly, it never stops being satisfying to watch a little house come together out of scraps.
Table of Contents
Why I Love This Project
I still remember the first house block I ever made. It was lopsided, the roof didn’t quite line up, and I loved it anyway. That’s the thing about a house pillow design — it doesn’t need to be perfect to look charming. The shapes are simple enough that even a slightly wobbly line reads as “handmade” rather than “mistake.” If you’re new to appliqué, this is a great place to start.
What You’ll Need
- Background fabric (linen or cotton, cut to about 16″ x 16″)
- Fabric scraps for the house, roof, door, and windows
- Fusible web, like HeatnBond or Wonder Under
- A pillow insert or some stuffing
- A sewing machine, or just a needle if you’d rather stitch by hand
- Thread — matching or contrasting, your call
- Fabric scissors, and pinking shears if you have them
How I Make Mine, Step by Step
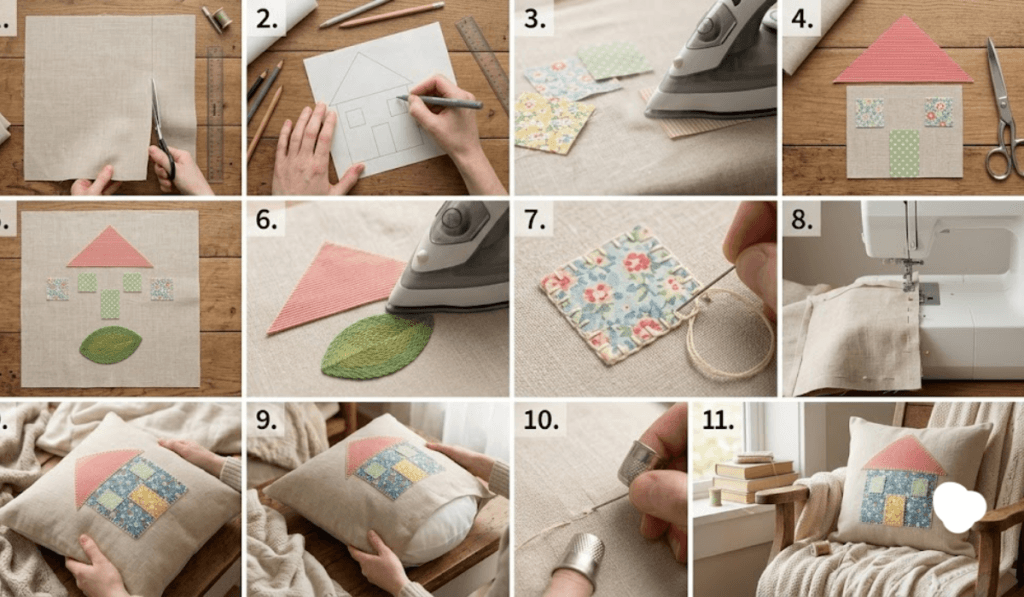
- Cut your background square first, adding a little seam allowance around the edges.
- Trace your house pieces onto the paper side of the fusible web — a square, a triangle for the roof, and small shapes for the door and windows.
- Fuse the shapes onto your scrap fabrics, then cut them out along the lines.
- Lay everything out on your background before you commit — house body down first, roof on top, then the door and windows.
- Iron it all in place once you’re happy with the arrangement.
- Stitch around each piece. I usually reach for a blanket stitch, but a simple zigzag works too.
- Sew the pillow front to the back, right sides together, and leave a gap so you can turn it right-side out.
- Stuff it or slide in a pillow form, then close up the opening by hand.
A Few Things I’ve Learned Along the Way
- A contrasting thread on the blanket stitch makes the house pop far more than matching thread ever does.
- Press every piece before you fuse it — skipping this step is the number one reason appliqué ends up looking bubbly.
- Cut your roof triangle a touch bigger than the house body so it overlaps nicely instead of leaving a gap.
- Don’t be afraid to mix a print door with solid windows, or vice versa — it adds personality.
Mistakes I Made So You Don’t Have To
- I once skipped pressing because I was in a rush, and the whole house ended up puckered. Don’t do what I did.
- Using a stretchy background fabric will fight you the entire time you’re sewing — stick to a stable woven cotton or linen.
- Cutting the door and windows too large throws off the whole look. Smaller than you think is usually right.
Questions I Get Asked a Lot
What size should a house pillow design be?
I default to 16″ x 16″ for most homes, but a 12″ x 12″ accent pillow is just as cute if you want something smaller.
Can I make this without a sewing machine?
Absolutely. A hand blanket stitch or whip stitch works beautifully and honestly gives the pillow a warmer, more handmade feel.
What fabric holds up best for the roof and body?
I almost always reach for quilting cotton. It presses flat, fuses cleanly, and doesn’t fray easily once it’s stitched down.
How do I keep the edges from fraying over time?
Fuse first, then finish every raw edge with a close zigzag or blanket stitch. Skipping either step is where fraying usually starts.
Can I personalize the design?
Definitely — I’ve added little trees, suns, even house numbers using the same fuse-and-stitch method. Once you know the basic technique, you can build on it however you like.
Before You Go
A house pillow design is one of those projects that teaches you everything — tracing, fusing, stitching — in one small, low-stakes square of fabric. Once you’ve made your first one, you’ll find yourself sizing it up, down, and sideways for gifts, nurseries, and everything in between.
By Sara McLean