

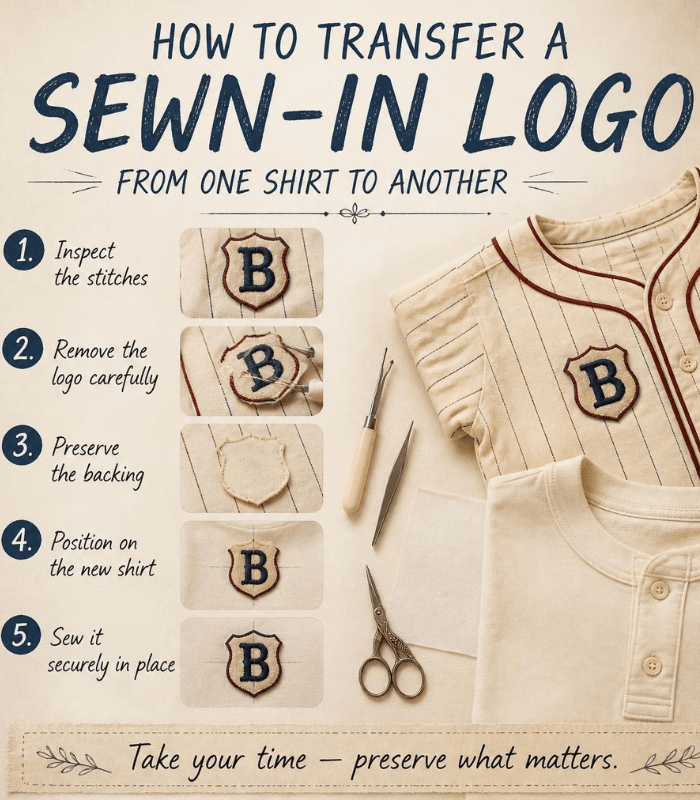
I nearly ruined my grandfather’s baseball shirt five years ago trying to save it. The embroidered crest had survived decades while the cotton disintegrated around it. That failure taught me everything—now I’ve successfully moved dozens of logos, and I’m sharing what actually works.
Here’s the truth nobody tells you: transferring a sewn-in logo isn’t complicated. It’s methodical. And method matters because you’re not just moving thread—you’re preserving something that matters.
Table of Contents
Understanding Your Logo Type Changes Everything
I wasted hours learning this the hard way. Not all stitched logos are created equal, and your removal method depends entirely on how it was originally attached.
Embroidered logos (stitched directly into fabric using decorative thread) are actually easier—the threads sit on top, backed by stabilizer underneath. The stitching creates the design itself, which means it comes off cleaner. Appliqué logos (fabric pieces sewn at the edges) require edge removal technique instead. You’re cutting around the perimeter, not unpicking individual design stitches. Combination logos blend both—appliqué base with embroidery on top—which means solving two problems simultaneously.
Spend five minutes examining yours before starting anything. Flip it inside out under magnification. See where stitches anchor? That inspection saves hours later.
Tools That Actually Work (Not Fancy Kits)
Quality seam ripper (Gingher or Clover, ~$6), fine tweezers, embroidery scissors, magnifying glass. That’s it. The magnifying glass alone reduced my removal time by 25% because you can actually see what you’re cutting instead of working blind.
Add stabilizer backing (tear-away or wash-away), matching embroidery thread, and a pressing cloth. Nothing fancy. Everything purposeful.
The Removal Process: Patience Over Speed
Flip your shirt inside out. You’ll see thread tails knotted at the back, backing material, and sometimes reinforcement stitches at corners. On my grandfather’s logo, removing corner stitches first made everything else come free—wish I’d discovered that sooner.
Use your seam ripper to slide under each stitch, cut the thread gently (not the fabric), and pull with tweezers. One stitch at a time. This takes 2–4 hours depending on logo size. I tried rushing once and caught the garment fabric in my ripper. Don’t rush.
Work under good light. Pause when tired. Mistakes happen when eyes are exhausted. Don’t pull aggressively on threads—if they’re stuck, you’ve missed a stitch. Find it and remove it first. When all perimeter stitches are gone, gently lift the logo. If it resists, hidden stitches remain. Stop and find them.
Transferring to the New Shirt
Position matters more than you’d think. I glued a logo three-quarters inch off-center once and had to remove everything. Now I position, wait five minutes, look from different angles, then commit.
Match fabric weights. A heavy embroidered logo on delicate cotton will eventually separate—the fabric can’t support the weight long-term. I learned this with a wool-felt logo on a thin t-shirt. Don’t repeat that mistake.
Stabilize from behind with backing material to prevent puckering. I hand-stitch around the perimeter with matching thread, then add machine stitching for strength. It takes extra time but looks authentic—like it belonged there originally.
What I Learned (The Hard Way)
Removing all backing material seems logical but fails—embroidery loses support and sags. Keep original backing whenever possible. It was necessary when it was put there.
Using regular thread instead of embroidery thread looks wrong and catches constantly. Match your thread type to your logo type.
Hidden stitches you miss become problems later. Always inspect both sides thoroughly before transfer.
Why This Matters Beyond the Task
When you transfer a logo, you’re deciding something is worth preserving. I’ve moved logos from shirts held together mostly by memories—my dad’s work shirt, my grandmother’s embroidered crest, a concert tee from 1985. Each transfer led to conversations, stories, connections to the people who wore them first.
Logo transfer isn’t about replacing garments. It’s about respecting craftsmanship and understanding that some things deserve a second life.
If you’ve got a shirt you can’t bear to throw away, that logo is worth saving. Take your time. Don’t rush the details. You’re preserving something that matters.
By Sara McLean
Sara McLean is the creator of AppliquéFits.com and a passionate textile designer specializing in appliqué and fabric design. She shares practical, beginner-friendly tutorials and creative ideas to make appliqué simple, useful, and enjoyable.