

A kantha quilt with batting is made by layering a quilt top, a piece of batting, and a backing fabric into a quilt sandwich, then hand-stitching through all three layers with the kantha running stitch. Here’s exactly how to do it, from prepping your fabric to binding the edges.
Table of Contents
What You’ll Need
- Quilt top fabric (cotton, linen, or repurposed sari silk)
- Backing fabric
- Low-loft cotton or cotton-blend batting
- Embroidery floss or perle cotton thread
- Hand-sewing needle (embroidery or crewel)
- Basting pins or spray baste
- Fabric scissors
- Fabric marker or tailor’s chalk
- Embroidery hoop (optional)
Step 1: Prep Your Fabric
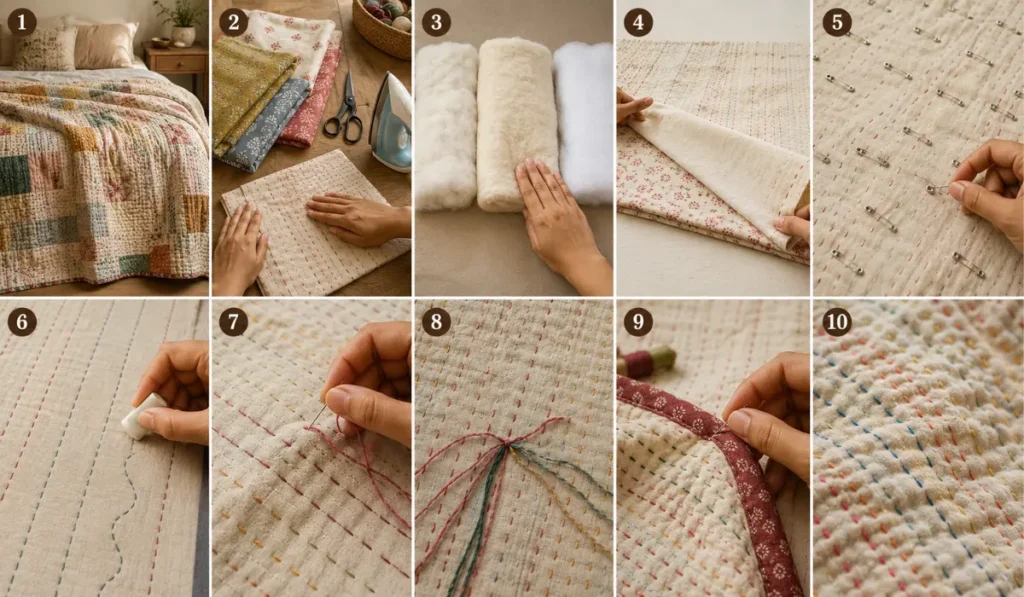
Wash and press your top and backing fabric before you cut anything. This stops uneven shrinkage after the quilt is finished and washed. If you’re upcycling old saris or shirts, cut them to your final quilt size now.
Step 2: Choose Your Batting
Pick a low-loft cotton or cotton-blend batting. It’s the easiest to hand-stitch through and keeps the drape closest to a traditional kantha. Wool adds more warmth but is harder to push a needle through by hand; polyester is budget-friendly but stiffer and less breathable.
Step 3: Build the Quilt Sandwich
Lay your backing fabric right-side down on a flat surface. Place the batting on top, smoothing out any wrinkles. Add your quilt top right-side up over the batting. Make sure all three layers are flat and squared up before moving on.
Step 4: Baste the Layers
Pin-baste every 4–6 inches across the whole quilt, or use spray baste for larger pieces. This keeps the layers from shifting while you stitch and prevents puckering in the wrong spots.
Step 5: Mark Your Stitch Lines (Optional)
Lightly sketch your design with chalk — straight rows, waves, or a simple motif. If you’d rather stitch freehand in the traditional style, skip this step entirely.
Step 6: Stitch the Kantha Running Stitch
Thread your needle and work small, even running stitches down through all three layers and back up, moving in rows or along your marked lines. Keep stitches slightly loose rather than pulled tight — this lets the batting stay lofted instead of flattening under tension. Uneven stitch length is part of the kantha look, so don’t aim for machine precision.
Step 7: Knot Off and Rethread
When you run out of thread, knot it on the back side or tuck the tail between the layers, then rethread and continue. Switch thread colors row by row for the classic multicolor kantha effect.
Step 8: Bind the Edges
Fold the backing fabric over the raw edges of the quilt top and stitch it down, or attach separate binding strips if you prefer a cleaner finish. This encloses the batting and keeps the edges from fraying.
Step 9: Press and Inspect
Give the finished quilt a light press on a low setting and check every seam and stitch line for gaps or loose threads before you call it done.
Common Mistakes to Avoid
- Skipping basting — leads to shifted layers and uneven puckering
- Using thick batting — slows down hand-stitching and tires your fingers fast
- Pulling stitches too tight — flattens the loft batting is meant to add
- Skipping the pre-wash — risks shrinkage after the first wash
Caring for Your Finished Quilt
Hand-wash or use a gentle cold-water cycle, then air-dry flat. High heat compresses natural fiber batting over time and can weaken hand-stitching, so avoid the dryer when you can.
FAQ
Does a traditional kantha quilt use batting?
No — traditional kantha gets its structure from stacked fabric layers, not batting. Adding batting is a modern variation for extra warmth.
What’s the best batting for hand-stitching a kantha quilt?
Low-loft cotton or cotton-blend batting, since it’s easiest to push a needle through by hand.
How much batting do I need?
Cut it 2–4 inches larger than your quilt top on all sides, then trim flush after basting.
Can I machine-stitch a kantha quilt with batting instead of hand-stitching?
Yes, though hand-stitching is what gives kantha its signature uneven, textured look.
 Sara McLean