

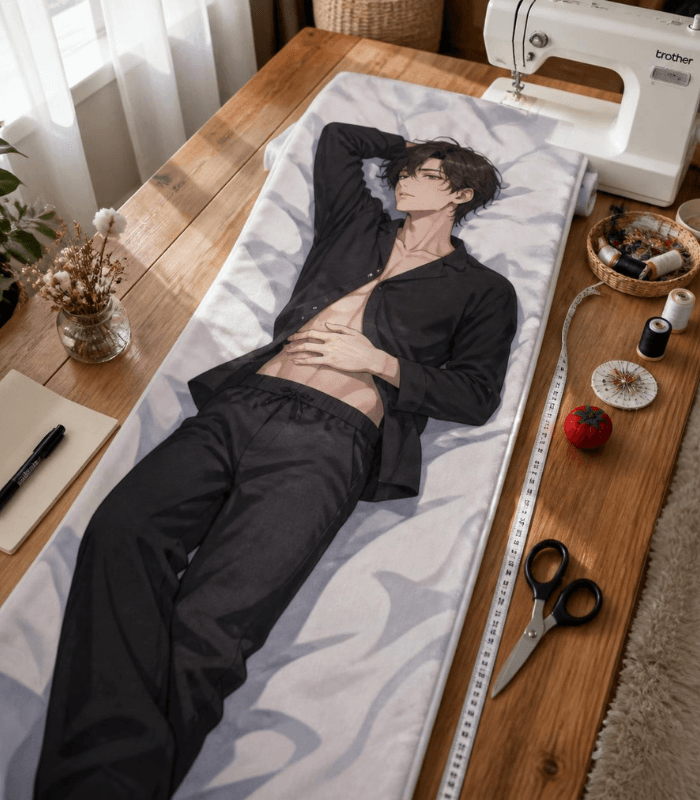
A dakimakura is a Japanese-style hugging pillow with a custom cover featuring anime characters, personal photos, or custom artwork. This guide teaches you how to design, print, and sew your own dakimakura cover at home without professional equipment.
Table of Contents
What Is a Dakimakura? Understanding Body Pillow Covers
A dakimakura (抱き枕) is a long, rectangular body pillow cover popular in Japanese culture. The word literally means “hug pillow.” These covers feature custom designs—typically anime characters, artwork, or photos printed on soft fabric.
Unlike store-bought options, creating your own dakimakura lets you personalize every detail: choose your artwork, select fabric quality, and add unique design elements like appliqués or embroidery.
Benefits of Making Your Own Dakimakura
- Complete Customization: Design exactly what you want instead of buying generic options
- Cost-Effective: Often cheaper than purchasing premium dakimakura online
- Personal Connection: Transform your favorite photos or artwork into a usable creation
- Skill Development: Learn valuable sewing and fabric printing techniques
- Creative Expression: Combine multiple design ideas into one unique piece
Materials & Tools You’ll Need
Essential Supplies
| Item | Purpose |
|---|---|
| Fabric (fleece or minky) | 150cm × 50cm minimum |
| Fabric printer ink or transfer paper | For printing designs |
| Thread (matching colors) | For sewing seams |
| Sewing machine (or needle + thread) | Joining fabric pieces |
| Scissors (fabric shears) | Cutting fabric accurately |
| Measuring tape | Getting precise dimensions |
| Pins or clips | Holding fabric in place |
| Iron | Pressing fabric and transfers |
Optional Tools
- Serger (for finished edges and durability)
- Embroidery supplies (for adding details)
- Binding tape (for reinforced seams)
- Spray adhesive (for transfer paper placement)
Choosing Your Fabric: The Foundation
Best Fabrics for Dakimakura Covers
Fleece
- Soft and affordable
- Holds print well
- Ideal for beginners
- Slightly less durable than alternatives
- Price: Budget-friendly ($3–8 per yard)
Minky
- Ultra-soft and luxurious
- Excellent print quality
- More durable than fleece
- Slightly higher cost ($8–15 per yard)
Cotton Poly Blend
- Breathable and practical
- Good for regular use
- Accepts prints well
- Mid-range pricing
Satin or Silk
- Premium finish
- Requires careful handling
- Best for experienced sewers
Sizing Your Fabric
Standard dakimakura dimensions:
- Length: 150–160cm (59–63 inches)
- Width: 50–55cm (20–22 inches)
Add 2–3cm seam allowance on all sides for cutting and sewing.
Designing Your Dakimakura: Creative Ideas
Popular Design Categories
Anime/Character Designs
- Full-body character artwork
- Minimalist character silhouettes
- Multi-character compositions
Photo-Based Designs
- Personal photographs (pet, loved one, yourself)
- Custom photo collages
- Black-and-white artistic photos
Artistic & Abstract
- Landscape scenes
- Geometric patterns
- Textile-inspired designs
Combination Designs
- Character on one side, pattern on reverse
- Split designs with contrasting themes
- Gradient backgrounds with focal imagery
Where to Find or Create Designs
- Commission an Artist: Hire illustrators on Fiverr, Deviantart, or Upwork ($50–300+)
- Use AI Art Tools: Generate designs with DALL-E, Midjourney, or Stable Diffusion
- Modify Existing Artwork: Use Photoshop or Canva to resize and adjust existing images
- Create Original Art: Draw your design with Procreate, Clip Studio Paint, or Adobe Illustrator
- Photography: Enhance personal photos with filters and color adjustments
Step-by-Step: How to Make Your Dakimakura
Step 1: Prepare Your Design File
What You Do:
- Size your artwork to 150cm × 50cm at 300 DPI (professional print quality)
- Adjust colors and brightness in photo editing software
- Create mirror images if designing both sides
- Save as high-quality file: PNG or PDF format
Pro Tip: Test print on regular paper first to check positioning and colors.
Step 2: Print Your Design
Method A: Transfer Paper (Recommended for Home Printing)
- Load transfer paper into your inkjet printer
- Print your design (mirror image for iron-on transfers)
- Follow manufacturer instructions for ink curing (usually 24 hours)
- Test adhesion on a fabric scrap before committing
Method B: Direct Fabric Printing
- Use fabric-safe inkjet ink in your printer
- Load fabric sheets designed for home printers
- Print directly onto fabric
- Heat-set per fabric ink instructions
Method C: Professional Printing (Best Quality)
- Upload your design to fabric printing services (Printful, Spoonflower, Comfy Prints)
- Choose dakimakura-sized panels
- Receive pre-printed fabric ready to sew
- Cost: $30–80 depending on service and design complexity
Step 3: Prepare Your Fabric
Cutting:
- Lay out your fabric flat on a clean surface
- Cut two identical rectangles (150cm × 50cm + seam allowance)
- For printed transfers, cut around your image leaving 1cm border
- Use a rotary cutter for straight, clean edges
Iron Setting:
- Press both fabric pieces to remove wrinkles
- Use low heat on fleece/minky to avoid melting
- High heat on cotton blends
Step 4: Transfer Your Design (If Using Transfer Paper)
- Position transfer face-down on fabric front, aligned precisely
- Set iron to cotton setting without steam
- Press firmly for 15–30 seconds, working in small sections
- Apply even pressure to avoid bubbles or missed spots
- Peel back slowly while still warm
- Cool completely before handling (at least 2 hours)
Step 5: Sew the Pillow Cover
Assembly Method (Machine Sewing):
- Pin pieces together with printed sides facing inward
- Stitch three sides completely:
- Start at one corner
- Use 1cm seam allowance
- Leave one 30cm side open for stuffing/turning
- Reinforce corners by sewing back-and-forth at each corner angle
- Turn inside-out through opening:
- Use a chopstick to push out corners gently
- Ensure seams are fully pressed outward
- Smooth edges with iron on low heat
- Close the opening using ladder stitch (invisible seam):
- Fold raw edges inward 1cm
- Pin opening closed
- Hand-stitch with matching thread
- Use small, close stitches (3–5mm apart)
Hand Sewing (No Machine Needed):
- Use needle and thread with backstitch
- Takes 3–5 hours depending on fabric thickness
- Produces equally durable results
Step 6: Insert Pillow Insert & Final Details
- Choose insert: Standard body pillow insert (available on Amazon, $15–30)
- Insert carefully through opening
- Arrange evenly inside cover
- Close opening with ladder stitch
Optional Finishing Touches:
- Add decorative buttons at seams
- Sew appliqués in corners
- Add embroidery details around edges
- Attach woven labels with your name
Common Mistakes to Avoid (And How to Fix Them)
| Mistake | Problem | Solution |
|---|---|---|
| Wrong fabric direction | Image prints upside down | Always test print orientation first |
| Seam allowance too small | Stitches tear easily | Remake with 1.5cm allowance |
| Iron too hot | Fabric melts or print transfers fade | Use low heat, test on scraps |
| Uneven transfer | Bubbles or blank spots in design | Use consistent, firm pressure |
| Loose stitching | Cover separates from seams | Use backstitch or smaller stitch length |
| Wrinkled final product | Looks cheap and unprofessional | Steam or iron gently after assembly |
Tips for Professional-Looking Results
✓ Use quality fabric: Minky or premium fleece creates better feel and appearance ✓ Print at high DPI: 300 DPI minimum ensures sharp, clear imagery ✓ Test everything: Always test transfers and stitches on small fabric scraps first ✓ Press frequently: Iron your work between steps for polished appearance ✓ Use matching thread: Pick thread that blends with fabric color ✓ Reinforce stress points: Double-stitch corners where fabric wears fastest ✓ Choose the right stitch: Use straight stitch for strength, not decorative stitches ✓ Measure twice, cut once: Precision saves materials and frustration
Design Inspiration: Ideas to Get Started
Easy Designs for Beginners
- Solid color background with centered character (simple, effective)
- Photo with gradient overlay (adds depth, hides minor imperfections)
- Geometric pattern with accent color (forgiving, modern look)
Intermediate Designs
- Two-tone split design (different image each side)
- Character surrounded by scenic background (shows technical skill)
- Collage of multiple smaller images (visually interesting)
Advanced Designs
- Full custom illustration (requires commissioning or strong art skills)
- 3D-effect layering with appliqué (uses sewing plus printing)
- Photo-realistic design with fine details (demands high-quality printing)
Troubleshooting Common Issues
Design Won’t Print Correctly
Problem: Color appears different than on-screen
- Fix: Calibrate your monitor, print color test strips first
- Fix: Check ink levels and nozzles in printer
Problem: Image appears pixelated or blurry
- Fix: Ensure original file is at least 300 DPI
- Fix: Use professional printing service for better quality
Fabric Issues During Sewing
Problem: Fleece keeps sliding during stitching
- Fix: Use walking foot on sewing machine
- Fix: Pin or clip fabric every 5cm
- Fix: Reduce presser foot pressure
Problem: Thread keeps breaking
- Fix: Check needle size (use 90/14 for most fabric)
- Fix: Re-thread machine, ensuring thread is seated in tension discs
- Fix: Use thread designed for stretch fabrics
Transfer Problems
Problem: Transfer won’t adhere to fabric
- Fix: Ensure fabric is clean and completely flat
- Fix: Use correct iron temperature (check transfer paper instructions)
- Fix: Apply consistent pressure for full duration
Problem: Transfer is too dark or too light
- Fix: Adjust printer color settings before printing
- Fix: Use transfer paper specifically for your ink type
Cost Breakdown: Budget vs. Premium
Budget Build ($40–60 total)
- Fleece fabric: $5
- Basic transfer paper: $8
- Thread: $3
- DIY design/print: $0–10
- Pillow insert: $20
Pros: Affordable, beginner-friendly Cons: May not last as long, print quality varies
Mid-Range Build ($80–120 total)
- Minky fabric: $12
- Quality transfer paper or print service: $25
- Premium thread: $5
- Commissioned artwork: $30–50
- High-quality insert: $30
Pros: Durable, professional appearance, better feel Cons: Higher investment upfront
Premium Build ($150–250 total)
- Premium minky or specialty fabric: $20–30
- Professional printing service: $40–80
- Embroidery supplies: $15
- Custom illustration commission: $100–150
- Luxury insert: $40–50
Pros: Heirloom quality, truly unique, luxury feel Cons: Significant investment, requires advanced skills
Frequently Asked Questions
How long does it take to make a dakimakura?
Most projects take 4–8 hours for beginners. This includes design preparation (1–2 hours), printing (1 hour), and sewing (2–5 hours depending on method). Professional sewers can complete one in 2–3 hours.
Can I wash my finished dakimakura cover?
Yes, but gently. Machine wash on delicate cycle with cold water, or hand wash. Turn inside-out to protect the printed image. Avoid hot water, which can fade colors. Air dry completely to prevent mildew.
What size pillow insert should I buy?
Look for standard “body pillow” or “dakimakura pillow” inserts (typically 50cm × 150cm). Check that your insert measurements match your sewn cover before purchasing.
Can I make a dakimakura without a sewing machine?
Absolutely! Hand sewing with needle and thread works perfectly. Use backstitch for durability. It takes longer (3–5 hours) but produces the same quality result. Many experienced sewers prefer hand-stitching for better control.
Where can I get designs if I can’t create my own?
You can commission artists on Fiverr, Upwork, or DeviantArt; use free design tools like Canva; request art from AI generators; or purchase pre-made designs from websites selling dakimakura artwork. Prices range from free to $200+.
Caring for Your Handmade Dakimakura
Weekly
- Fluff by hand to maintain shape
- Brush away dust with soft cloth
Monthly
- Gentle spot cleaning with mild soap and cool water
- Air in sunlight to freshen (avoid direct heat)
Quarterly
- Full delicate wash cycle, inside-out
- Air dry completely (48+ hours)
Annually
- Check seams for damage
- Repair small tears immediately with ladder stitch
- Replace insert if it becomes flat (usually 2–3 years)
Final Thoughts: Making Your Perfect Dakimakura
Creating your own dakimakura transforms a favorite image or character into something tactile and personal. Whether you’re a beginning crafter or experienced sewer, the process is rewarding and accessible.
Start with a simple design using quality fleece, follow the steps carefully, and don’t hesitate to practice on scraps first. Your handmade cover will last years with proper care and bring joy every time you use it.
Ready to start? Pick your favorite image, gather your supplies, and create something uniquely yours today.