

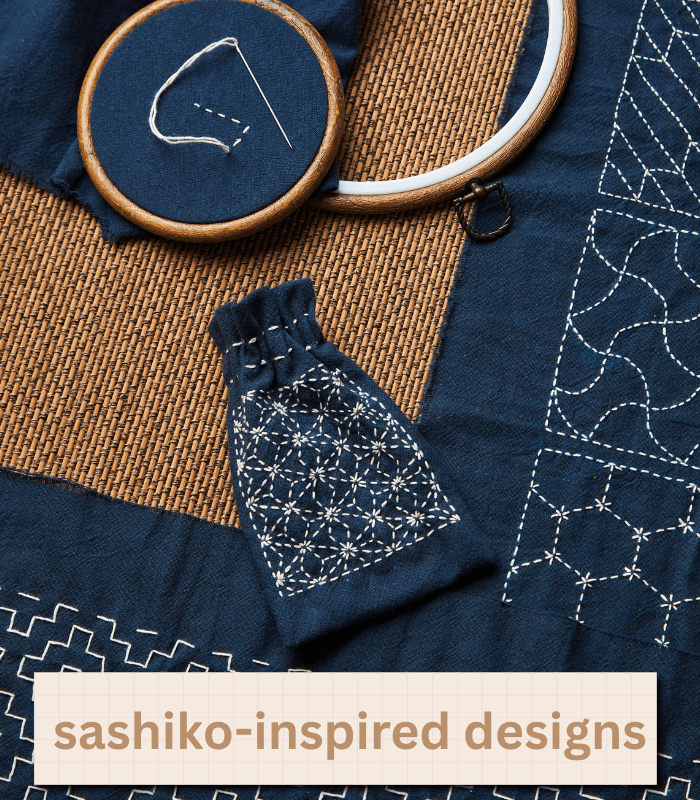
My first sashiko panel took three attempts before I got the stitch proportion right. I kept making the gaps too wide, chasing speed instead of rhythm, and the grid came out looking uneven in a way that was hard to photograph and impossible to ignore in person. It wasn’t until I slowed down and started counting — stitch, gap, stitch, gap — that the pattern actually started to look like the reference photos I’d been staring at.
Table of Contents
What Is Sashiko?
Sashiko translates to “little stabs,” a literal description of the small, even running stitches at its core. Traditional sashiko uses white thread on indigo-dyed fabric for high-contrast geometric patterns; modern practice has widened that to a full range of colors and fabric pairings. It’s used both to reinforce worn fabric — a technique called boro when paired with visible patching — and as freestanding decorative embroidery.
Materials You’ll Need
- Sashiko thread: a thick, matte cotton thread made specifically for sashiko, distinct from standard embroidery floss.
- Sashiko needle: long, sturdy, with a larger eye built to hold multiple stitches at once.
- Fabric: traditionally indigo cotton, though any tightly woven cotton or linen works for practice. I did my first panel on a leftover linen scrap, and it held the marking chalk beautifully.
- Marking tool: chalk, a water-soluble fabric pen, or a pre-printed sashiko panel with the design already marked.
- Ruler or grid template: essential for marking straight, evenly spaced geometric patterns — I skipped this on attempt one and regretted it within the first row.
- Thimble: useful for pushing the needle through several stitches at once.
Basic Sashiko Stitch Technique
The foundation is a small, even running stitch in a specific proportion — the visible stitch on top runs slightly longer than the gap between stitches, roughly a 2:1 or 3:2 ratio.
- Mark the design onto the fabric with a straight edge or template for clean lines.
- Thread the needle with a working length of 24–30 inches — sashiko thread is sturdy enough to handle more length than typical embroidery floss.
- Knot the thread end with a simple hand-sewing knot.
- Load multiple stitches onto the needle before pulling through. This is the technique’s defining move, the thing that separates it from an ordinary running stitch. Rock the needle in and out of the fabric several times, gathering three or more stitches on it at once. This is the exact step I rushed through on my first attempt — pulling the thread through after every single stitch instead of loading several first, which is part of why the rhythm never settled.
- Pull the thread through smoothly, letting the fabric gather slightly and then flatten as the line is smoothed with the fingers.
- Keep stitches even in length and spacing along the marked design.
- Secure the thread at the end with a small knot, or by weaving the tail through the back of nearby stitches.
Common Beginner Patterns
Traditional sashiko patterns repeat across a grid, which makes them genuinely approachable for a first attempt:
- Hitomezashi: the simplest pattern family, straight rows of running stitches on a grid, often combined into crosses or diamonds. This is what I finally got right on attempt three.
- Juji-tsunagi (linked crosses): a grid of small crosses formed by stitching straight rows both horizontally and vertically.
- Asanoha (hemp leaf): a more advanced, star-like pattern worth attempting once straight-line patterns feel routine.
- Shippo (interlocking circles): overlapping circular motifs linked into a chain-like design.
Most beginners start with a straight grid before moving to curved or interlocking designs.
Tips for Even Sashiko Stitching
- Keep tension consistent — enough to lie flat without puckering the fabric underneath.
- Plan the stitching path so it passes through each intersection point once, cleanly, rather than doubling back and piling up thread.
- Practice on a plain grid before attempting a more decorative motif like asanoha.
- Use a hoop if it helps hold tension steady, though I stitch mine without one now, guiding the fabric with my fingers the way a lot of sashiko stitchers eventually settle into.
Using Sashiko for Visible Mending
Sashiko has become a go-to technique for visible mending — reinforcing worn spots on jeans, jackets, or household textiles with decorative stitching, often paired with a patch of contrasting fabric underneath. My first real sashiko project, after that practice panel, was a mended knee on a pair of work jeans — nothing decorative-only about it, just a patch and a grid of stitches that’s outlasted the rest of the denim around it.
Final Thoughts
Sashiko is one of the more approachable entry points into hand embroidery, built on a single repeated stitch rather than a full technique library. It took me three tries to get the rhythm right, and the fourth attempt is the one still holding together a pair of jeans I’d otherwise have thrown out. Start with a simple grid on a practice scrap, hold spacing and tension steady, and the more intricate traditional patterns follow naturally from there.